
Free Pre-Start Checklist (Ped Grinder) Template
Download our Free Pre-Start Checklist (Ped Grinder) Template. This DOCX & PDF resource helps formalise daily safety checks to manage WHS risks.
Free Pre-Start Checklist (Ped Grinder) Template
DOCX • 125 KB + PDF
Updated Oct 2026
No signup required
Purpose of the Free Pre-Start Checklist (Ped Grinder) Template
Pedestal grinders are powerful and common pieces of workshop equipment that present significant risks, including wheel shatter, entanglement, and eye injuries from sparks and debris. A systematic pre-start inspection is a critical control measure to ensure the grinder is in safe working order before operation.
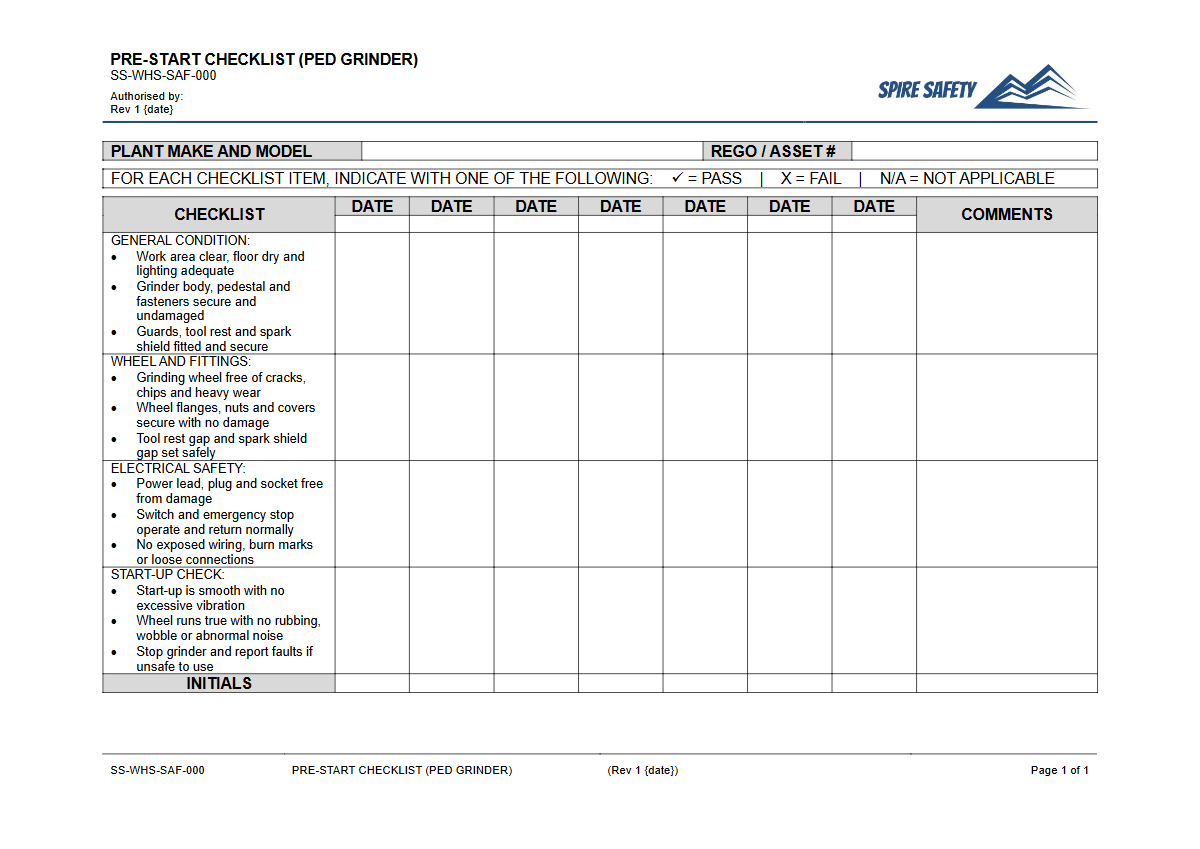
This Free Pre-Start Checklist (Ped Grinder) Template provides a structured format for operators to verify key safety components and functions, helping your organisation meet its duty of care. Documenting these checks creates a record of due diligence and promotes a proactive safety culture.
Integrating these daily checks is a fundamental component of effective WHS management systems. It moves safety from a theoretical concept to a practical, repeatable task. By identifying defects like cracked wheels or excessive guard gaps before they cause an incident, you can take corrective action and prevent serious harm.
Video walkthrough
How to Use the Free Pre-Start Checklist (Ped Grinder) Template
This template is designed for straightforward daily use. Operators should be trained to complete the checklist before their first use of the pedestal grinder each day or at the start of their shift.
The process involves visually inspecting each item listed and ticking it off to confirm its condition. Any identified faults, damage, or concerns must be immediately reported to a supervisor, and the grinder should be tagged out of service until it is repaired by a competent person and deemed safe to use.
Important: This document is a template and must be customised for your specific workplace. We are not WHS lawyers; this is a starting point, not a complete solution.
You must adapt it to include the make and model of your grinders, your site-specific procedures, and any unique hazards present in your operating environment. Consultation with operators and review of the manufacturer's instructions is essential for creating a truly effective checklist.
For similar equipment, you might also find our Free Pre-Start Checklist for Bench Grinders useful as a reference.
When to Use This Pre-Start Checklist
The pre-start inspection should be performed at the following times:
- Before the first use of the pedestal grinder on any given day or shift.
- After a change of the abrasive wheel.
- If the grinder has been moved or subjected to impact.
- If a new operator is taking over mid-shift who did not perform the initial check.
Regular, consistent use is key to the effectiveness of any pre-start process. It should become a non-negotiable habit for all authorised personnel, reinforcing safe work practices every time the equipment is used.
Who Should Use It
This checklist is intended for use by competent personnel who have been trained and authorised to operate a pedestal grinder. This typically includes:
- Workshop personnel, tradespeople, and apprentices.
- Maintenance staff who use grinders for tool sharpening or fabrication.
- Supervisors, who are responsible for overseeing the process and ensuring any reported defects are actioned promptly.
Verifying operator competency is a key responsibility for a PCBU (Person Conducting a Business or Undertaking). If you need assistance in developing training and competency frameworks, consider engaging specialist WHS consulting to ensure your processes are robust and aligned with industry best practice.
Key Inspection Areas
While this template provides a comprehensive starting point, several areas on a pedestal grinder demand particular attention due to their high-risk nature. The checklist prompts the user to focus on critical components that are common failure points or are essential for safe operation.
Critical Component Checks
- Abrasive Wheels: Check for any cracks, chips, or signs of damage. A damaged wheel can shatter at high speed, projecting fragments with violent force. Perform a 'ring test' on new wheels before mounting to check for invisible cracks.
- Guarding: Ensure all guards (wheel guards, tongue guards, and spark arrestors) are in place, secure, and properly adjusted. The tongue guard and tool rest should have a maximum gap of 3mm and 2mm respectively from the wheel.
- Tool Rest: The tool rest must be secure, in good condition, and correctly adjusted to prevent the workpiece from being jammed between the rest and the wheel.
- Emergency Stop: If fitted, the emergency stop button must be tested to ensure it functions correctly and immediately cuts power to the motor.
- Housekeeping: The area around the grinder should be clear of clutter and flammable materials. Good housekeeping prevents slip and trip hazards and reduces fire risk from sparks.
Documenting these checks for all high-risk plant is a sound practice. The principles applied here are similar to those in a pre-start checklist for floor saws, where rotating parts and operator safety are paramount.
Integrating the Checklist into Your WHS System
A pre-start checklist is not an isolated tool. To be effective, it must be part of a broader safety management framework.
This includes having clear safe work procedures for pedestal grinder use, providing adequate training and competency verification, and establishing a robust defect reporting and maintenance program. Completed checklists should be retained as a record of inspection and reviewed periodically.
These records can be invaluable during regular WHS compliance audits as evidence of your organisation's proactive risk management efforts. For those seeking to formalise their entire safety framework, this type of documentation is a foundational element.
If your business is looking for more tools and templates, you can browse our complete free WHS resources library for a wide range of documents aligned with Australian safety practices.
Common mistakes
Common mistakes to avoid
- Failing to adjust the tool rest and tongue guard as the wheel wears down.
- Using a grinder without appropriate eye and face protection.
- Grinding on the side of a standard abrasive wheel, which it is not designed for and can weaken it.
- Continuing to use a grinder after a fault has been identified but not reported or rectified.
Legal references
Legal considerations
The following legal requirements may be relevant to this type of work.
- Work Health and Safety Act (Harmonised) — Provides the primary duties for protecting workers and other people from work health and safety risks.
- Work Health and Safety Regulations (Harmonised) — Sets out requirements supporting the management of workplace hazards and risks.
The following codes may be relevant to this type of work.
- Managing WHS Risks Code of Practice — Provides practical guidance on identifying hazards, assessing risks and applying effective controls.
- Work Health and Safety Consultation, Cooperation and Coordination Code of Practice — Provides practical guidance on consulting workers and coordinating with other duty holders.
- Managing the Work Environment and Facilities Code of Practice — Provides practical guidance on safe work environments, workplace facilities and related controls.
Did you know
Wheel Speed is Critical
Every grinding wheel has a maximum safe operating RPM (Revolutions Per Minute) printed on its label. It is a critical safety failure to mount a wheel on a grinder whose operating RPM exceeds the wheel's maximum rating, as this can cause it to shatter.
The 'Ring Test'
Before mounting a new vitrified wheel, competent persons perform a 'ring test' by tapping it gently with a non-metallic object. A clear, metallic ring indicates the wheel is likely free from cracks, while a dull thud suggests it may be damaged and should not be used.
FAQ
Frequently asked questions
01What is the correct gap for a pedestal grinder tool rest and tongue guard?
02Is a pre-start checklist a legal requirement in Australia?
03How often should a pedestal grinder wheel be 'dressed'?
04Can I use this template for a bench grinder as well?
Share this resource
Free Pre-Start Checklist (Ped Grinder) Template
Browse Categories
How To Use It
- 1Download and open in Word or PDF.
- 2Replace the placeholders with your business details.
- 3Get it reviewed by a WHS specialist before rollout.
Need it customised?
Our WHS consultants can adapt this template to your site, run a gap analysis, or audit what you already have in place.
Book a Free Consultation Explore Consultancyor call 1300 156 382